


Django templates
Time to display some data! Django gives us some helpful built-in template tags for that.
What are template tags?
You see, in HTML, you can't really write Python code, because browsers don't understand it. They know only HTML. We know that HTML is rather static, while Python is much more dynamic.
Django template tags allow us to transfer Python-like things into HTML, so you can build dynamic websites faster. Cool!
Display post list template
In the previous chapter we gave our template a list of posts in the posts variable. Now we will display it in HTML.
To print a variable in Django templates, we use double curly brackets with the variable's name inside, like this:
blog/templates/blog/post_list.html
{{ posts }}
Try this in your blog/templates/blog/post_list.html template. Open it up in the code editor, and replace the existing <article> elements with {{ posts }}. Save the file, and refresh the page to see the results:
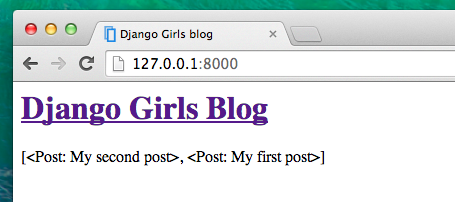
As you can see, all we've got is this:
blog/templates/blog/post_list.html
<QuerySet [<Post: My second post>, <Post: My first post>]>
This means that Django understands it as a list of objects. Remember from Introduction to Python how we can display lists? Yes, with for loops! In a Django template you do them like this:
blog/templates/blog/post_list.html
{% for post in posts %}
    {{ post }}
{% endfor %}
Try this in your template.
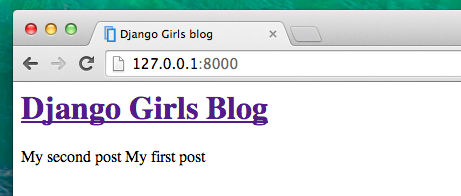
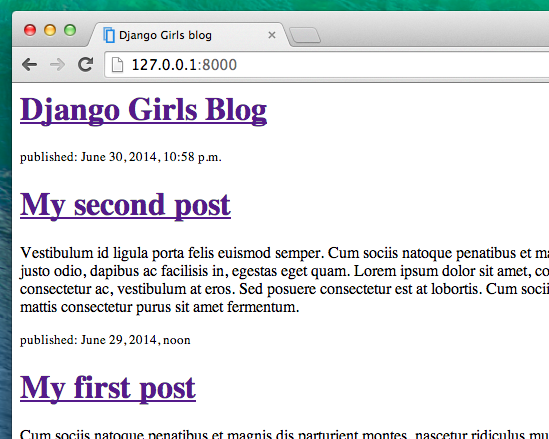
It works! But we want the posts to be displayed like the static posts we created earlier in the Introduction to HTML chapter. You can mix HTML and template tags. Our body will look like this:
blog/templates/blog/post_list.html
<header>
    <h1><a href="/">Django Girls Blog</a></h1>
</header>

{% for post in posts %}
    <article>
        <time>published: {{ post.published_date }}</time>
        <h2><a href="">{{ post.title }}</a></h2>
        <p>{{ post.text|linebreaksbr }}</p>
    </article>
{% endfor %}
Everything you put between {% for %} and {% endfor %} will be repeated for each object in the list. Refresh your page:
Have you noticed that we used a slightly different notation this time ({{ post.title }} or {{ post.text }})? We are accessing data in each of the fields defined in our Post model. Also, the |linebreaksbr is piping the posts' text through a filter to convert line-breaks into paragraphs.
One more thing
It'd be good to see if your website will still be working on the public Internet, right? Let's try deploying to PythonAnywhere again. Here's a recap of the steps…
- First, push your code to GitHub
command-line
$ git status
[...]
$ git add .
$ git status
[...]
$ git commit -m "Modified templates to display posts from database."
[...]
$ git push
- Then, log back in to PythonAnywhere and go to your Bash console (or start a new one), and run:
PythonAnywhere command-line
$ cd <your-pythonanywhere-domain>.pythonanywhere.com
$ git pull
[...]
(Remember to substitute <your-pythonanywhere-domain> with your actual PythonAnywhere subdomain, without the angle-brackets.)
- Finally, hop on over to the "Web" page and hit Reload on your web app. (To reach other PythonAnywhere pages from the console, use the menu button in the upper right corner.) Your update should be live on https://subdomain.pythonanywhere.com -- check it out in the browser! If the blog posts on your PythonAnywhere site don't match the posts appearing on the blog hosted on your local server, that's OK. The databases on your local computer and Python Anywhere don't sync with the rest of your files.
Congrats! Now go ahead and try adding a new post in your Django admin (remember to add published_date!) Make sure you are in the Django admin for your pythonanywhere site, https://subdomain.pythonanywhere.com/admin. Then refresh your page to see if the post appears there.
Works like a charm? We're proud! Step away from your computer for a bit – you have earned a break. :)
